Components

Throughout the process of preparing the car for new, electric parts, I have been researching exactly the parts I will need. Here are the main parts that go into an electric conversion.

  • Electric motor, replaces typical engine
  • Batteries, provide energy for motor
  • Controller, regulates the flow of energy from the batteries to the motor
  • Charger, recharges the batteries
In its simplest form, this is what a conversion comes down to: these four main parts. Of course there are other things necessary like a throttle potentiometer, main contactor, electric steering pump, vacuum pump for the power brakes, and gauges for measuring the battery pack, but these are minor details in the concept of an electric car. As for the components that I have chosen to use:
  • Warp9 motor. This is a DC brush motor. Weighing about 150 pounds, it will replace the 550 pound engine that I just took out.
  • Thunder Sky 200AH LiFeYPO4 Batteries. This is some of the newest technology as far as batteries go, and should provide me with the greatest range, as well as the lowest weight.
  • Zilla 1k controller.
  • Elcon HF/PFC 3kW Charger
Warp9 motor
Thundersky 200AH battery


Elcon 3kW charger
Zilla 1k controller

Gas Tank Removal

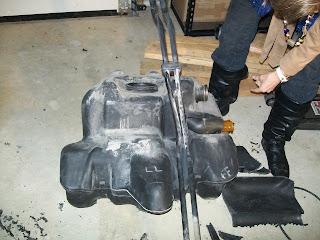
The gas tank was not easy to remove. It was placed so that it couldn't be simply taken out with out removing  the steering column (something I didn't feel comfortable doing). So I took the easy way out, or so I thought. With various saws and other cutting tools I chipped away at it piece by piece until it could slip out. Clearly the gas tank was specifically designed to not puncture so this was not as easy as I had anticipated. It took about four days to get it out.
Top of the gas tank.

Bottom of the gas tank, after I got through with it.
Notice the odd shape and how nicely the coolant lines fit into it. The tank was designed to maximize every tiny bit of space available to use. That's the beauty of German engineering!
Complete system
Tools I used to cut through the thick plastic.

This is the space that the gas tank used to fill up. I will be putting batteries here instead.

Engine Removal

The next step was to prepare the car for the conversion by removing all components that won't be needed in the final product. This includes:

  • Engine
  • Gas Tank
  • Muffler
  • Radiators
  • Fuel/coolant/AC lines
Here are some highlights of removing the engine. I did this over a couple of weekends with the help of my dad.

After removing the rear bumper for better access to engine compartment.

This is a view from the rear of the car showing the transmission, still attached to the rear wheels.  Because the Boxster is a mid-engine car, the engine is directly on the other side of the transmission.
View of the top of the engine.


Removing the transmission was difficult because it is about 100 lbs, but the process is pretty straight forward. Just unbolt it and pull it away carefully.

Again a view from the rear of the car, this time after the transmission was removed.  The  circular object in the center is the flywheel, which spins with the engine and transmits power to the transmission, which then transmits this rotating power to the wheels.

The engine is removed from the bottom, so this tool helps to  lower it . By twisting the handles at the top, the chain gets lower and the engine drops with it. I also had multiple jack stands set up below the engine (it weighs 550 lbs!)

Me where the transmission used to be. The flywheel is also removed in this picture.

With the engine completely lowered, we still needed to raise the car  higher than the jack stand would go, which we  did  by putting the stand on pieces of wood.

My father and I with the removed engine.

View of the engine compartment after the engine was removed.  You can see all the way through the car to the  passengers seats.